v2.12.0 is live


RELEASE NOTES
1. What's New
1.1 New quick tasks screen
1.1.1 Redesigned Kanban
The Quick Tasks Kanban has been completely renovated, with improvements focused on experience and performance.
Now, any changes to column settings appear immediately on the board without needing to save or reload the page. Card movement is also smoother, featuring animations during dragging, and updates happen in real-time.
Additionally, the screen is lighter: on boards with many tasks, the system only loads the cards visible in the scroll area, which prevents freezing and significantly improves usage speed. In practice, a board with hundreds of tasks distributed across columns now loads as fast as a board with only a few.
See how the new Quick Tasks Kanban looks:
1. General appearance of the kanban

2. Appearance of the new kanban cards

1.1.2 Reformulated task details
The task details side panel has been reorganized to improve navigation and information separation.
The structure now features four tabs:
- Task: displays the description and the linked action (when applicable), focusing on task execution.
- Comments: a new tab to centralize task communication.
- Audit Logs: a new tab with a detailed history of changes.
This separation makes navigation clearer and facilitates access to information according to the context of use. For example, to check who changed a task's status and when, simply access the Audit Logs tab directly in the panel, without needing to leave the task context or navigate to another screen.
See how the new Task Details side panel looks:
1. The side tab features a central execution area, divided into 3 tabs, and a details sidebar

2. By dragging the bar, you will have access to more information

3. The Task tab features a section with the most important data for task execution and a section for executing the required activity, if applicable

4. The Comments tab is a space for quick collaboration between your team members. Any user with permission can log comments

5. In the Audit Logs tab, you can see the full tracking of actions on that task, even when executed by the system itself (in the case of Spaceflow workflows)

1.1.3 Filters and period
Field filters are available in a dedicated panel, with options to filter by status, priority, description, and other fields. The period selector now features a visual calendar with shortcuts (last 7/14/30 days, last 3/6 months, last year) and support for single-day or range selection.
For example, to view only urgent tasks that expired in the last 7 days, simply combine the priority filter with the corresponding period shortcut.
See how the new date filters for the Quick Tasks Kanban look:
1. In this button, you can define whether the filter should use Creation or Due Date as the base for the time calculation

2. Click the button next to it to open the date selection for the time filter

3. By default, the Single Day option will be selected and you will see a calendar

4. When clicking Range, the calendar view expands to two simultaneous months, where you can define the start and end of a period

5. And in the sidebar, you can select a predefined period

🗺️ Navigate through the new quick tasks screen:
Important:
You can navigate by clicking on the areas circled in orange or by using the arrows in the bottom right corner of the interactive area.
Want to know more about quick tasks? Check the documentation.
1.2 Spaceflow: new flow editor
The Spaceflow visual flow editor has been redesigned. The new version brings a cleaner interface, with nodes and the side panel in a leaner layout, and several new features that speed up flow assembly and maintenance.
1.2.1 Shortcut for node creation
It is now possible to create nodes directly from an existing node without opening the side panel. By clicking the semicircle on the side of a node, the system displays the full list of available components. Simply select the desired one, and the new node will be created automatically, already connected to the previous one by an edge.
In practice, when setting up an approval flow with several sequential steps, the configurator can chain task, conditional, and email nodes one after the other without having to drag them from the panel and connect them manually, significantly reducing assembly time.
1. Select a semicircle on the sides of a node and drag its edge to an empty spot on the canvas

2. Select the desired option for the new node to be generated automatically

3. The new node is automatically connected to the previous one

1.2.2 Enhanced edge customization
The customization popover for edges (the connections between nodes) has been completely reformulated. Now, by clicking on an edge, the configurator has access to more comprehensive controls: path type (straight or curved), color palette, thickness control with a slider, style options (dashed and animated), and a field to add descriptive labels. A reset button allows restoring the original configuration at any time.
For example, in a flow with multiple conditional paths, the configurator can use different colors to visually distinguish the approval path from the rejection path and add labels like "Approved" and "Declined" on the corresponding edges.
1. Hover over an edge and click the button to configure it

2. The customization menu allows adjusting format, color, thickness, style, and label

1.2.3 Contextual menu on nodes
The editor nodes now feature a contextual menu with three quick actions: Edit, Duplicate, and Delete. The menu appears when interacting with the node, without needing to open the configuration sidebar.
The Duplicate action is especially useful in flows with repetitive steps: by duplicating an already configured task node, all parameters are preserved in the copy, avoiding the rework of configuring each step from scratch.
1. When clicking a node, the contextual menu is displayed with Edit, Duplicate, and Delete options

1.2.4 Editor toolbar
The editor has gained a floating toolbar in the bottom left corner of the workspace, with navigation controls that facilitate working on flows of any size:
- Zoom in/out: zoom in and out of the canvas.
- Fit view: automatically centers and frames the entire diagram with a single click.
- Vertical and horizontal auto-layout: reorganizes all flow nodes into an aligned arrangement, either in a vertical cascade or a horizontal line, making it easier to read flows that became disorganized after several edits.
- Minimap: displays a small panoramic view of the entire flow, allowing you to quickly navigate between large groups of nodes without losing global context.
1. The toolbar is located in the bottom left corner of the canvas

2. Auto-layout reorganizes the flow into a vertical cascade or horizontal line

3. The minimap displays the panoramic view of the entire flow

The button to open the node panel has also been updated: it is now a rounded floating button, taking up less canvas space during editing.

1.2.5 New layout for variable tabs
The Input Variables and Output Data side tabs, which appear when configuring a node in the editor, have been redesigned to make finding fields and data easier.
Key changes include:
- Search field: it is now possible to filter variables by name or key directly in the tab, without having to manually expand the entire data tree to find the desired field.
- New visual layout: the tabs now feature icons, colors, and a clearer visual hierarchy, making variable navigation more intuitive.
- Redesigned close button: previously, clicking to open and close the tab happened on the same side edge. Now, the close button is fixed at the top of the tab in a more accessible position.
In practice, in a flow with many input variables (form fields, data from previous tasks, item references), the configurator can type the field name in the filter and locate it instantly instead of expanding each group manually.
1. When opening a node's edit view, you will notice a new tab structure—more eye-catching, colorful, and featuring illustrative icons

2. Upon expanding the tabs, you will notice a new search box to facilitate variable navigation

3. And the presence of a button to close the tab, available for both Input and Output

🗺️ Navigate through the new Spaceflow editor:
Important:
You can navigate by clicking on the areas circled in orange or by using the arrows in the bottom right corner of the interactive area.
Want to know more about Spaceflow? Check the documentation.
1.3 Spaceflow: new executions screen
The Spaceflow executions screen has been reformulated to offer more visibility into how flows behave in production. In practice, if an execution results in an error at a specific node, the configurator can open the canvas, visually identify where the flow stopped, and click the node to check the input that caused the failure.
1.3.1 Execution listing
The new listing organizes executions in a table with reference, status, version, and start date columns. The search field allows locating specific executions by reference.
1. On the Spaceflows screen, click the desired flow to analyze its executions

2. You will see the linear execution history of the selected flow

1.3.2 Execution details
When opening an execution, the screen is divided into three tabs:
- Execution Flow (Canvas): displays the flow with visual emphasis on the path taken (in dashed green) and nodes that were not executed (in gray). By clicking a node, a tooltip shows the input and output data for that step.
- Details: presents a side panel with general execution information (reference, status, version, start times, and last update) and, below, a list of all nodes with their respective status, timestamps, and buttons to expand each one's input and output.
- Logs: displays a detailed chronological timeline with every execution event: workflow start, start and completion of each node (with execution time), edges traversed, and any errors.
1. When opening an execution, you will see the basic data on the left and the three tabs at the top

2. In the Execution Flow tab, the canvas shows the path taken with input/output tooltips on the nodes

3. In the Details tab, you can follow technical data about the flow's configuration and execution

4. In the Logs tab, you can track the entire execution trace, from trigger fire to the last task

🗺️ Navigate through the new executions screen:
Important:
You can navigate by clicking on the areas circled in orange or by using the arrows in the bottom right corner of the interactive area.
Want to know more about Spaceflow executions? Check the documentation.
1.4 Spaceflow: Artificial Intelligence nodes
Spaceflow now features two new Artificial Intelligence nodes, available in the AI category of the node panel: AI Generator and AI Router. They allow incorporating AI directly into automation flows, expanding processing and decision-making possibilities.
1.4.1 AI Generator
Uses AI to produce textual content or JSON-structured responses directly within the flow. It can be used to generate descriptions, summaries, emails, or any textual output based on the data available in the execution. For example, upon receiving a complaint item, the node can automatically generate a response draft for the customer based on the ticket data.
Here is how the AI Generator node works:
1. In the node settings, select the specific language model that will be used

2. In the system instruction field, you can enter context guidelines to guide the AI's behavior in processing your task

3. In the Prompt field, type the direct command for the task the AI should perform

4. After completing the prompt with the necessary variables, simply save to finish the configuration

🗺️ Navigate through the AI Generator node:
Important:
You can navigate by clicking on the areas circled in orange or by using the arrows in the bottom right corner of the interactive area.
1.4.2 AI Router
Analyzes the flow content and automatically directs the execution to the most appropriate route based on criteria defined by the configurator. It works like an intelligent conditional where the AI evaluates the context and chooses the best path. For example, upon receiving a service request, the AI can analyze the description and direct the flow to technical support, financial, or commercial routes, depending on the message content.
Here is how the AI Router node works:
1. In the node settings, select the desired AI model

2. Define the creativity level of the AI response, from 0 to 2

3. Define the desired prompt

4. You can add as many routes as you wish

5. After saving the settings, you will notice that the node displays on the canvas the routes you configured, plus one extra route

🗺️ Navigate through the AI Router node:
Important:
You can navigate by clicking on the areas circled in orange or by using the arrows in the bottom right corner of the interactive area.
Want to know more about Spaceflow AI nodes? Check the documentation: Generator and Router.
1.5 Spaceflow: Delay Node
Spaceflow gains a new node in the Logic and Control category: Delay. It allows you to insert a scheduled pause between flow steps, controlling the exact moment the next action will be executed.
The configurator defines the wait time and the unit (seconds, minutes, hours, or days). When execution reaches the Delay node, it waits for the configured period and then automatically proceeds to the next node.
An example use case: in an onboarding flow, after sending a welcome email, a 3-day Delay can be inserted before generating a follow-up task, ensuring the responsible party only receives the task after the new member's adaptation period.
How to configure the Delay node:
1. In Spaceflow, the Logic and Control section features the Delay node

2. Configure the Node Name (optional), the Time Quantity, and the interval Unit (Seconds, Minutes, Hours, or Days)

3. Connect the input and output edges to the rest of the flow so the delay is applied correctly

🗺️ Navigate through the Delay node:
Important:
You can navigate by clicking on the areas circled in orange or using the arrows in the lower right corner of the interactive area.
Want to know more about the Delay node? Consult the documentation.
1.6 AI Agents: New Reviewer Agent Type
The AI Agents screen now features a new available agent type: the Reviewer.
The Reviewer agent is specialized in reviewing documents, identifying errors, and suggesting improvements. It is ideal for quality control and content validation tasks, automating review steps that previously relied on manual analysis. For example, in a contract publication flow, the Reviewer agent can analyze the document before sending, identify inconsistencies, and suggest corrections.
With this addition, ENSPACE offers two types of AI agents: Chat/Text, designed for conversational interactions (answering questions, providing information, and maintaining natural conversations), and Reviewer, focused on document analysis and improvement.
How to configure a Reviewer Agent:
1. On the AI Agents screen, click the Create New Agent button

2. In the sidebar that opens, under the Essential tab, go to the Agent Type field

3. You will see two enabled options:

4. The new option, Reviewer, allows for the creation of an agent specialized in reviewing documents, identifying errors, and suggesting improvements—ideal for quality control tasks

Want to know more about AI agents? Consult the documentation.
2. Improvements
2.1 Document Seals: More Sizing Control
The document seal (stamp) functionality has been enhanced, providing more flexibility in configuring the images used.
Until now, the seal image had to be uploaded at the ideal size, being automatically reduced to 80x80px if necessary. Now, per member or per Workflow task, you can choose between:
- Automatic size, respecting the limits of the uploaded image itself
- Custom size, by entering width and height directly into the system
This eliminates the need to pre-adjust the image using external tools.
How to configure the seal size per member:
1. In the Member Details window that opens, click the Seal button

2. Under the seal size definition, select Personalized mode

3. Define Height and Width
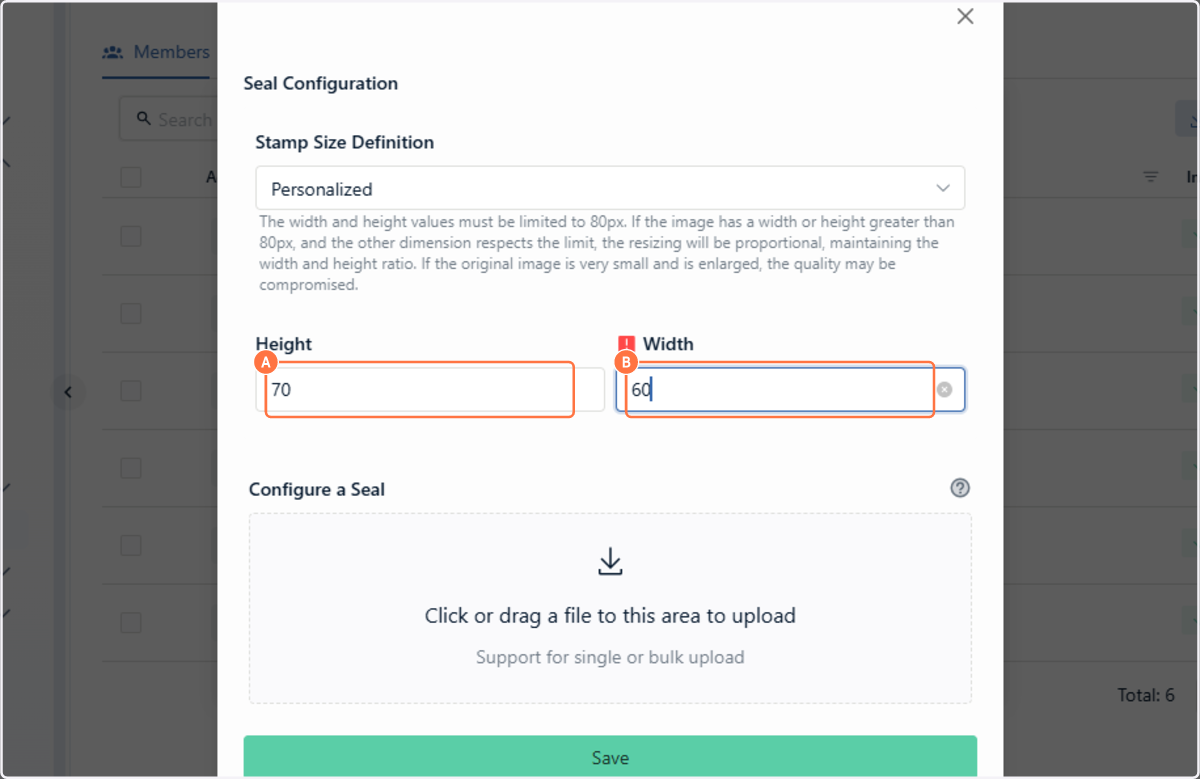
4. Upload the image you want to use for your seal in the file field

5. Click Save and your seal will be ready for use!

🗺️ Navigate through the seal configuration per member:
Important:
You can navigate by clicking on the areas circled in orange or using the arrows in the lower right corner of the interactive area.
How to configure the seal size per Workflow task:
1. In a task in your flow, go to the Action tab and enable the Generate PDF option
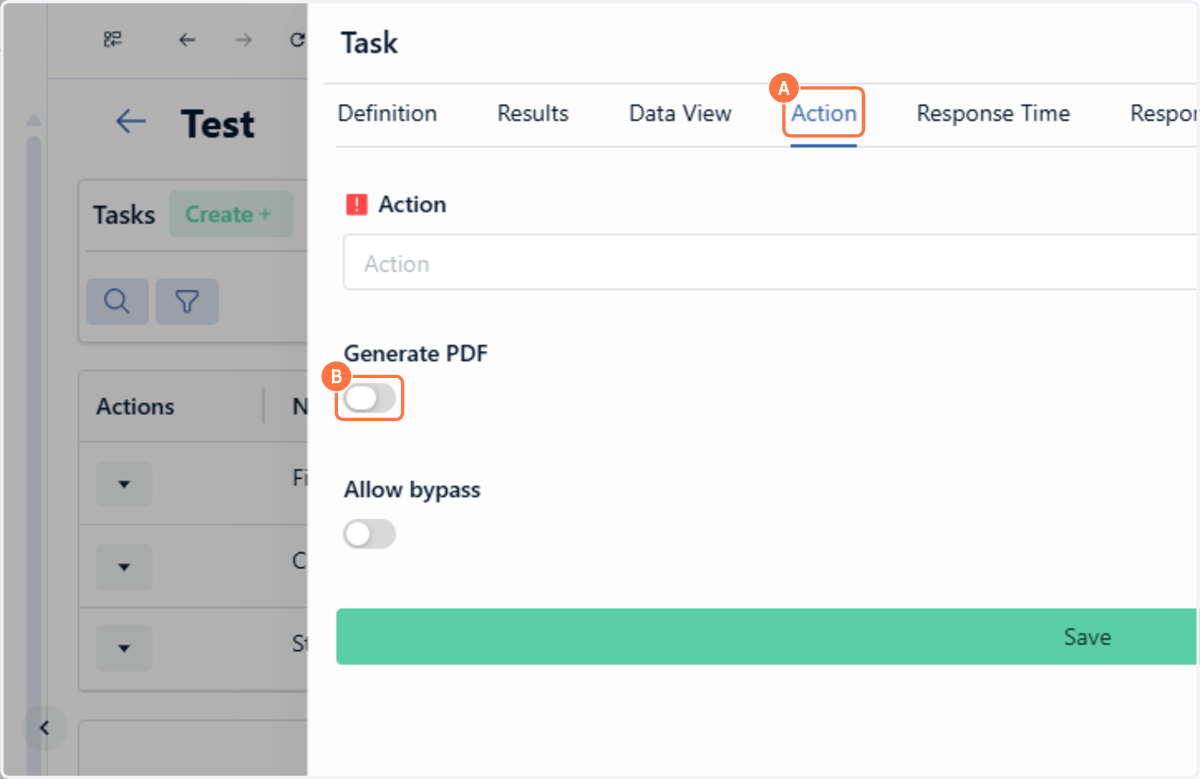
2. Enable the Insert Seal option, which will appear after activating the previous option

3. After selecting the seal type and position, you will see a Seal Size Definition option

4. Select the Custom option

5. Upload your seal file in this field

6. Click Save

🗺️ Navigate through the seal configuration per task:
Important:
You can navigate by clicking on the areas circled in orange or using the arrows in the lower right corner of the interactive area.
Want to know more about document seals per member? Consult the documentation. Want to know more about document seals per Workflow task? Consult the documentation.
2.2 Spaceflow: New Field Types in Automatic CRUD
The CRUD node in automatic mode (which performs create, update, delete, or read actions without human intervention) now supports three new field types in the field map: address, group, and person/company.
Until now, fields with nested structures were not recognized by automatic CRUD. In practice, if a configurator needed to automatically create a customer item that included the full address or linked company data, it was necessary to handle these fields outside the flow or through manual steps. Now, these fields can be mapped directly in the node configuration, allowing the flow to fill in all item information at once.
The mapping offers two ways to work. The first is whole mapping: by dragging a composite field variable (such as a group field) to a key of the same type, the system performs an automatic mapping of all subfields, provided the references are the same. For example, if the flow receives an "Address" field with street, number, city, and zip code, simply drag it to the "Address" field of the destination category for all subfields to be filled at once.
The second is subfield mapping: the configurator can map each subfield individually, choosing which ones to fill and with which values. For example, in a "Full Name" field with "First Name" and "Last Name" subfields, it is possible to fill only the "First Name" subfield with a "customer name" variable, leaving "Last Name" empty or filled from another source.
How nested field mapping works in the CRUD node:
1. When selecting the Create action, a new field will open. This is the field for mapping the structure of the CRUD action

2. In this field's modal, you should select the fields that will undergo the action in the target category. In our example, you will be selecting which fields the system will fill automatically at the time of creating a new item

3. The selected fields have been added to the CRUD configuration map, showing internal groupings for the address field

4. Note that the variable for an Address type field is nested (it has other variables inside it)

5. Simply drag it exactly to the title of the grouped field—in this case, the title of the Address type field

6. Automatically, all nested fields will be filled with the compatible values

🗺️ Navigate through nested field mapping in CRUD:
Important:
You can navigate by clicking on the areas circled in orange or using the arrows in the lower right corner of the interactive area.
Want to know more about the CRUD node? Consult the documentation.
2.3 Workflow Tasks: "Access Item" Button
Tasks generated by Workflow that are linked to an item now display an Access Item button at the top of the task panel. The button works as a direct shortcut to open the related item, eliminating the need to manually navigate to the items screen to locate it.
How the "Access Item" button works:
1. In the task sidebar, navigate to the Items tab

2. Click the Access Item button

3. The system will redirect you to the item screen, with all data available for consultation

🗺️ Navigate through the Access Item button:
Important:
You can navigate by clicking on the areas circled in orange or using the arrows in the lower right corner of the interactive area.
Want to know more about Workflow tasks? Consult the documentation.
2.4 Language Selector in Header
The platform header now displays a language selector in the top right corner. The button shows the flag of the active language and, when clicked, opens a dropdown with available system languages. The change is applied immediately, without the need to access settings or reload the page.
How the language selector button works:
1. Observe the Header of your Workspace

2. In the top right corner, you will find a button with the flag of the active language

3. When clicked, it offers ENSPACE's 3 native language options

4. Select the desired language

2.5 Authentication: Silent SSO for Persistent Session
The login experience in ENSPACE has been enhanced with the implementation of Silent SSO (Silent Single Sign-On), an authentication technique that automatically renews the user's session in the background without requiring interaction.
Previously, it was common for the system to request a new login in unexpected situations: when closing and reopening the browser or when spending a few minutes in another tab. Now, the session is maintained persistently, even after closing the browser or switching between tabs.
Want to know more about authentication? Consult the documentation.
3. Bug Fixes
3.1 Copy Link Button Restored in External Quick Tasks
The copy link button had disappeared from the quick tasks screen when the task was external. The fix restores the button, allowing you to copy the task access link normally.
3.2 Feature Announcement Banner Untranslated
The new features announcement banner (released in the previous version) was not being translated into English and Spanish, remaining in Portuguese regardless of the language configured by the user. The fix ensures that the banner and its buttons are displayed in the correct system language.
3.3 Error when deleting categories and workspaces
When attempting to delete a category or a workspace, the system returned an error and did not allow the action to be completed. This fix restores the deletion functionality in both cases.
v2.11.0 is live
This release includes 24 items: 6 new features, 9 improvements, and 9 bug fixes. Highlights include custom AI agents per workspace, personalized translation dictionaries, and a financial module with digital wallet and credit requests.
v2.13.0 is live
This release includes 17 items: 2 new features, 7 improvements, and 8 bug fixes. Highlights include custom translation dictionaries per workspace and the playbooks interface for AI agents.