v2.11.0 is live


RELEASE NOTES
1. New features
1.1 AI Agents: custom agent management
ENSPACE now allows each workspace to create and manage its own custom AI agents, in addition to BENI (the platform's default AI assistant).
The new agent management screen displays each agent as a card with key details (name, description, status, model, role, and usage metrics). Agent creation is handled through a sidebar organized into step-by-step tabs: essentials, personalization, advanced settings, and testing. In the testing tab, you can send a message to the agent and review its response, metrics, and execution trace before making it available.
Once active, the agent becomes available in the workspace's AI chat. Users can switch between BENI and any custom agent directly in the chat, whether in the dedicated screen or the floating panel.
🗺️ Explore the AI Agents screen:
Note:
You can navigate by clicking the areas circled in orange or using the arrows in the bottom-right corner of the interactive area.
Want to learn how to create and configure AI agents? See the documentation.
1.2 Financial Module: digital wallet and credit requests
ENSPACE now includes a new Billing tab, bringing integrated financial management to the system. The tab can be accessed two ways: through the System menu under workspace General Settings, or through the user panel, accessible by clicking your photo or icon in the top-right corner of the platform.
The screen is divided into two sections. The first is the User Wallet, which displays the available balance in en-credits (ENSPACE's own currency), the wallet status (active/inactive), and the full transaction history. Each entry shows the amount, type (debit for platform charges, credit for balance top-ups), a contextual description, and the date. The history supports continuous loading, allowing you to browse all transactions without traditional pagination.
The second section is Credit Requests, where members can request credits and track the status of each request. Requests are organized by status (pending, approved, rejected, canceled), with tab-based filters for easy lookup.
See the new Billing system:
1. At the top of the page, you can check your current amount of credits in the respective workspace, as well as your wallet status

2. Your request is now listed in the section

3. At the bottom of the page, you will see your wallet's Transaction History, showing credits and debits in detail

🗺️ Explore the Billing screen:
Note:
You can navigate by clicking the areas circled in orange or using the arrows in the bottom-right corner of the interactive area.
1. Access from the workspace sidebar:
2. Access from the user panel:
Want to learn more about the digital wallet and credit requests? See the documentation.
1.3 Integrations: credential management screen
ENSPACE now includes a dedicated credential management screen, accessible through the new Credentials menu in the workspace sidebar. Here, configurators can register and organize authentication credentials (such as tokens and API keys) in one centralized place.
Registered credentials are available for use across workspace integrations, so configurators don't need to expose or re-enter sensitive data for each new configuration.
🗺️ Explore the Credentials screen:
Note:
You can navigate by clicking the areas circled in orange or using the arrows in the bottom-right corner of the interactive area.
Want to learn how to manage integration credentials? See the documentation.
1.4 Spaceflow: HTTP node
Spaceflow now includes a new node type: the HTTP node. It allows you to configure external API calls directly within a Spaceflow, without relying on external tools to orchestrate communication.
Previously, integrating ENSPACE with other systems during an automation required building and maintaining the integration outside the platform. Now, the HTTP call is configured as just another node in the flow, keeping the entire automation centralized within Spaceflow. The configurator defines the request method, URL (with support for flow variables), headers, parameters, request body, and response mapping. The node can also use pre-configured credentials from the credential management screen, so sensitive data doesn't need to be entered manually for each flow.
🗺️ Explore the HTTP Request node:
Note:
You can navigate by clicking the areas circled in orange or using the arrows in the bottom-right corner of the interactive area.
Want to learn how to configure the HTTP node? See the documentation.
1.5 Feedback: new feature banners and screen ratings
Starting with this release, every major new feature launched in beta will display a banner at the top of the screen, letting users know they're viewing a new layout. The banner includes a button to switch back to the previous version, ensuring users aren't locked into an experience that's still being validated and can continue working normally if they prefer. The banner can be dismissed at any time using the "X" button.
Within the banner itself, a feedback icon lets users rate the experience on a 1-to-5-star scale with an optional comment. These ratings help the ENSPACE team gather feedback faster, identify which features are well received, which need refinement, and which should be discontinued.
Once a feature exits beta and becomes official, the banner and feedback icon are removed automatically.
See the new feature banner with the feedback icon:
1. When accessing a screen with a new feature available, you will see a banner like this

2. If you are not yet comfortable using the new feature, you can choose to Switch back to the original version

3. After switching back to the original version, the button available in the banner will again be Try new version

🗺️ Explore the new feature banner:
Note:
You can navigate by clicking the areas circled in orange or using the arrows in the bottom-right corner of the interactive area.
Want to learn more about how new feature alerts work? Acess the documentation.
1.6 Releases: release notes screen within ENSPACE
The Releases screen, with ENSPACE's full version history, was previously only available through the external documentation site. It is now available as a native screen within the system for all workspaces. The new screen can be accessed from a new option in the left sidebar, just above the "documentation" menu, allowing users to check release notes without leaving ENSPACE.
See how to access the Releases screen:
1. In the left sidebar of your workspace, under the Help section, click on Releases

2. You will see a screen like this one

3. You can access the content of a specific release by clicking on its preview image or title

🗺️ Explore the Releases screen:
Note:
You can navigate by clicking the areas circled in orange or using the arrows in the bottom-right corner of the interactive area.
2. Improvements
2.1 BENI AI: floating chat panel improvements
The BENI AI floating panel received several usability improvements.
The panel now includes a history sidebar, letting you access previous conversations directly in the chat without leaving your current context. It also supports drag & drop repositioning and free resizing, so you can adjust the chat's size and position as needed.
Additionally, when you open the panel, pending responses are loaded automatically, eliminating the need to resend unanswered questions. The open/close animation has also been refined for a smoother transition.
See the floating panel with the history sidebar:
1. On any screen of your workspace, click the floating BENI AI icon

2. In the top-left corner of the floating chat, you can click the icon to expand the history tab

3. All your conversation history will be available and interactive

Note:
You can navigate by clicking the areas circled in orange or using the arrows in the bottom-right corner of the interactive area.
Want to learn more about BENI AI? See the documentation.
2.2 Audit Logs: formatted changes and adaptive filters
The Audit Logs screen received improvements in two areas: viewing and filtering. For viewing, each log entry now displays changes in a side-by-side comparison (before/after), making it easier to identify what was modified in each operation. Audit messages have also been enriched with more descriptive text that clearly identifies the action type, affected field, and values involved.
For filtering, the screen now includes a set of adaptive filters: column-specific date filters (supporting single day and date range), selection filters with built-in search, a button to clear all filters at once, and automatic pagination reset when any filter changes.
See how changes are displayed in the log record:
1. On the Logs screen, click on the log you want to view in detail

2. In the sidebar that opens, you will see a summary of the recorded log

See how adaptive filters look on the Logs screen:
1. The logs table provides date filters and specific filters per column

2. Configure the filter as desired

3. You can combine column filters with a date filter by accessing its settings in the upper-left corner, next to the search box

4. A. You can select a custom range
B. Or you can select a predefined option
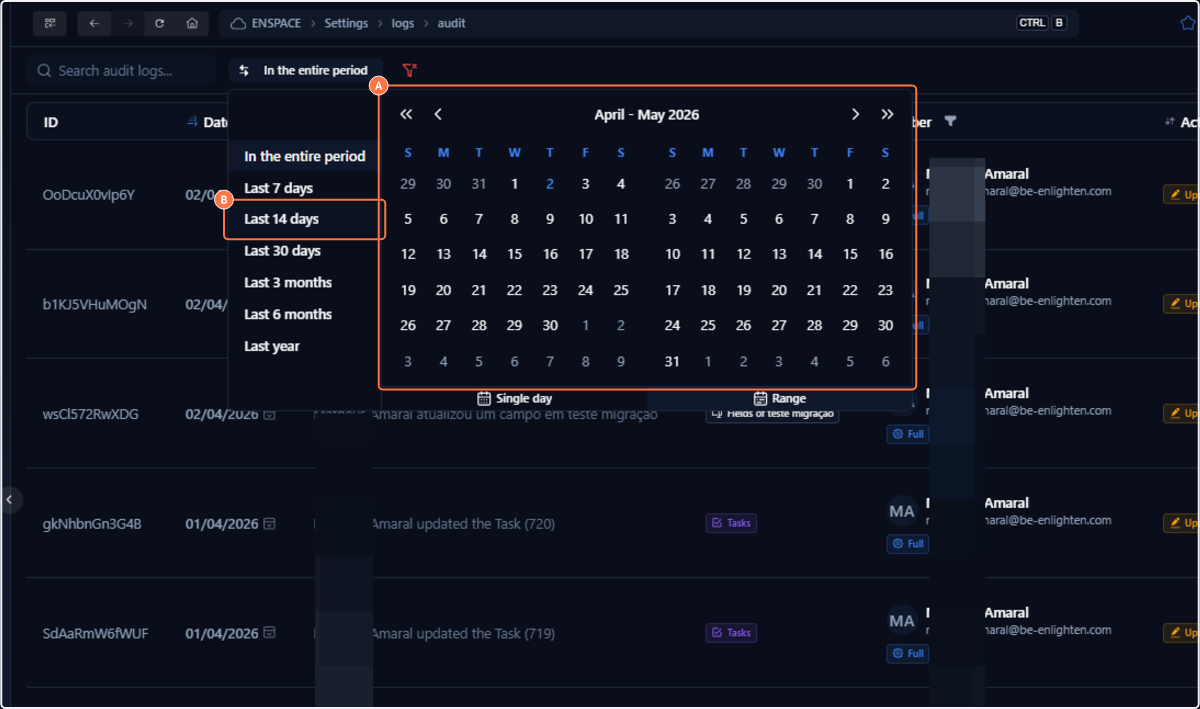
5. You will notice that both types of filters (column and date) are active simultaneously

🗺️ Explore the Audit Logs screen:
Note:
You can navigate by clicking the areas circled in orange or using the arrows in the bottom-right corner of the interactive area.
Want to learn more about Audit Logs? See the documentation.
2.3 Task Notifications
ENSPACE now allows the configuration of automatic email notifications for tasks, with separate controls for Quick Tasks (Spaceflow) and Scheduled Tasks. The configuration is found under Settings → System → Notifications and lets you define the exact trigger time, the time unit, and the email template to be sent.
🗺️ Explore the new Task Notifications:
Note:
You can navigate by clicking the areas circled in orange or using the arrows in the bottom-right corner of the interactive area.
2.4 Conditionals: conditional visibility between group and repeater subfields
Subfields within group and repeater fields now support conditional visibility between each other. Previously, all subfields were always visible, with no way to hide one based on another's value.
Now you can set up rules like "the 'last name' subfield only appears when 'first name' is filled in", directly in the group or repeater field settings.
🗺️ Explore conditionals in group subfields:
Note:
Click "Open" to be guided through your own ENSPACE session, or click "Continue" to follow the tutorial on the current screen.
🗺️ Explore conditionals in repeater subfields:
Note:
Click "Open" to be guided through your own ENSPACE session, or click "Continue" to follow the tutorial on the current screen.
Want to learn how to configure conditionals? See the documentation.
2.5 Conditionals: group subfield support in the form builder
In the form builder's block conditional editor, the reference value list is no longer flat, it's now nested, allowing you to select subfields within group.
Previously, conditionals could only reference top-level fields. To create a rule based on a specific subfield — like "show field X only when the 'role' subfield inside the 'professional details' group equals 'manager'", the configurator had to duplicate the subfield as a standalone field outside the group structure, creating redundancy and data modeling complexity.
Now, the configurator navigates directly through the field structure and selects the desired subfield, without needing workaround fields. This enables smarter forms where sections appear or disappear based on answers within a group.
🗺️ Explore form conditionals:
Note:
Click "Open" to be guided through your own ENSPACE session, or click "Continue" to follow the tutorial on the current screen.
Want to learn how to configure conditionals? See the documentation.
2.6 Conditionals: field renaming and dynamic target value
The conditional creation modal received two improvements. First, the field previously labeled "Reference Value" has been renamed to "Reference Field", making the label more accurate.
Second, the "Target Value" field is now dynamic, automatically adapting to the type of the selected field. If the field uses a list, the target value shows a dropdown with available options. For free text, it opens a text input. For date, number, or boolean fields, the appropriate controls are displayed automatically. This behavior matches the one already used in the filter modal on item and task screens.
🗺️ Explore the new field conditional builder:
Note:
Click "Open" to be guided through your own ENSPACE session, or click "Continue" to follow the tutorial on the current screen.
Want to learn how to configure conditionals? See the documentation.
2.7 Fields: help text in group and repeater subfields
Subfields within group and repeater fields now support help text. Previously, this setting was only available for top-level fields, which limited guidance for users in forms with nested structures.
With this improvement, each subfield can have its own help text, reducing input errors and improving the experience in more complex forms.
🗺️ Explore help text configuration in subfields:
Note:
Click "Open" to be guided through your own ENSPACE session, or click "Continue" to follow the tutorial on the current screen.
Want to learn how to configure group fields? See the documentation.
Want to learn how to configure repeater fields? See the documentation.
2.8 Forms: reduced spacing between additional content and label
In the form builder, when adding additional content above a field, the vertical gap between that content and the field label was too large, creating a sense of visual disconnect. The spacing has been reduced to roughly one-third of the previous size, making the relationship between additional content and the field clearer and more compact.
Before the improvement:

After the improvement:

Want to learn how to configure forms? See the documentation.
2.9 Migration: multi-select now accepts semicolon-separated values
When migrating items in bulk via spreadsheet upload, multi-select fields required values to be formatted as a JSON array. For example, to import an item with "Finance" and "Legal" selected, the spreadsheet cell had to contain exactly: ["Finance","Legal"], including brackets, quotes, and commas. Any formatting error would prevent correct import.
Now the system also accepts a simplified format, separating options with a semicolon: Finance;Legal. The conversion is handled automatically, with no additional setup required. The JSON array format continues to work for those already using it.
Want to learn more about item migration? See the documentation.
3. Bug fixes
3.1 Relationships: inconsistent preview in display format
When configuring the display format for a simple relationship field, typing {{ to insert a reference to a target category field didn't always show all available fields in the suggestion list. Additionally, even when manually referenced, the preview remained blank or showed only --
The fix ensures all target category fields appear in the suggestion list and the preview accurately reflects the configured value.
3.2 Email: "Access Enspace" link pointing to old version
In external task emails, the "Access Enspace" button was directing users to the old platform version (V1) instead of the current one.
The fix updates the link to point to the correct address.
3.3 Tables: item disappears depending on pagination range
On the items and tasks screen, when increasing the number of records displayed per page, certain items would disappear from the list. With default pagination, the item showed normally, but when expanding the range, it became hidden.
The fix ensures items are displayed consistently, regardless of pagination settings.
3.4 Relationships: failure when relating items within the same category
When configuring a relationship field to link items within the same category, the system returned an error, preventing the link from being created.
The fix restores relationship functionality between items in the same category.
3.5 Forms: preview doesn't reflect label changes in group fields
In the form builder, when editing the label of a group field via block settings, the value was saved correctly, but the form preview kept showing the old label.
The fix syncs the preview with the saved value, reflecting changes immediately.
3.6 Items: entity creation freezes when tax registry doesn't return a company name
When creating an entity-type item with tax registry validation, if the service didn't return a company name, the form would enter an endless loading state, preventing the item from being saved.
The fix makes the process resilient to incomplete tax registry responses, allowing the item to be saved even when the company name is unavailable.
3.7 Fields: required indicator missing on checkbox fields
Checkbox fields configured as required did not display the visual required indicator (the usual asterisk or icon). Validation worked correctly and blocked submission, but users had no visual cue that the field was required.
The fix restores the required indicator on checkbox fields.
3.8 Fields: fields disappear when switching field type
In the field creation or editing modal, when switching from a type that has the "Interface and Formatting" tab to a type without it, the configuration fields would disappear from the screen. Navigating to another tab and back would make them reappear.
The fix eliminates the inconsistent behavior, keeping fields visible during type changes.
3.9 Fields: extra bracket when using variables in Spaceflow
In Spaceflow, when using variables in text fields (either by typing manually or dragging from the inputs tab), an extra opening bracket was generated outside the variable tag. For example, when dragging the variable {{item.reference}}, the system correctly created the visual tag with {{item.reference}} inside it, but added an extra { outside, resulting in {{{item.reference}}}. This caused execution errors since the variable format was invalid.
The fix removes the extra bracket, ensuring variables are inserted in the correct format.
v2.10.0 is live
This release includes 11 items in total: 2 new features, 3 improvements, and 6 bug fixes. Highlights include the new audit log screen, customizable labels per form, and a redesigned report builder.
v2.12.0 is live
This release features 14 items: 6 new features, 5 improvements, and 3 bug fixes. Highlights include the redesign of the visual editor, the new executions screen, and the arrival of Artificial Intelligence nodes to Spaceflow, in addition to the complete overhaul of the quick tasks screen.