v2.13.0 is live


RELEASE NOTES
1. What's New
1.1 Dictionaries: custom workspace translation
ENSPACE now supports custom translation dictionaries per workspace. With them, members with the appropriate permission can translate texts created during workspace setup, such as field names, descriptions, form names, field help texts, category names, and other user-configured content.
The dictionaries screen offers three ways to update translations:
- Manually: editing each translation directly on the dictionary screen, key by key.
- Bulk via spreadsheet: importing a spreadsheet with all translations at once, ideal for workspaces with large volumes of fields and content.
- Via AI: using the automatic translation button to translate all items at once, or applying AI translation individually to each item.
In practice, this means a workspace configured in Portuguese can have all its labels, descriptions, and help texts translated into English, Spanish, or any other supported language, ensuring users from different countries navigate the same structure with text in their own language.
Workspace configuration screens (such as type modeling, fields, and forms) remain in the original language, with no translation applied, as they are accessed exclusively by configurators who need terminological consistency to maintain the workspace structure.
📋 Step by step: setting up translations in the dictionary
In the left sidebar, click on System and access the Dictionaries tab

Select the target language. Workspace categories will appear organized by sections, with counters for translated and untranslated terms

Expand a category to see its subsections: General (category data), Fields, and Forms

To translate manually, fill in the translation field directly on the term's row. To translate an individual term via AI, click the AI button to the right of the field

To translate all empty fields at once via AI, click the AI button in the top right corner. Progress will be shown in the toolbar

For bulk spreadsheet translation, use the buttons next to the AI button: download the template, fill it in, and upload it

Once translations are set up, click Save. They will be automatically applied to the workspace

🗺️ Guided tour: Dictionaries screen
Important:
You can navigate by clicking on the areas highlighted in orange or using the arrows in the bottom right corner of the interactive area.
Want to know how to configure translation dictionaries? See the documentation.
1.2 AI Agents: playbooks interface
The AI Agents screen now features a new tab: Playbooks.
Playbooks are sets of rules, guidelines, and criteria that guide the behavior of reviewer-type agents, functioning as a "reference manual" the agent consults to analyze, validate, and evaluate content consistently.
In practice, a playbook can contain writing style rules, document approval criteria, compliance checklists, tone-of-voice guidelines, or any other set of instructions the agent needs to follow when reviewing content. For example: in a legal workspace, a playbook can specify that contracts must include mandatory LGPD clauses, that monetary values must be written out in full, and that the language must be formal. The reviewer agent automatically consults these rules when analyzing a document via chat.
The playbooks screen offers full management (creation, editing, viewing, and deletion). Each playbook consists of:
- Instructions: general guidelines the agent should follow when consulting the playbook.
- Output format and tone: definitions of how the agent should structure and write its responses during review.
- Rules: intellectual guidelines with name, description, category, and severity level, which shape the agent's judgment when reviewing content.
- Verification items: a checklist the agent must validate before delivering the result, ensuring no criterion goes unnoticed. Each item can be marked as required for content approval.
The screen is divided between custom playbooks (created by the configurator) and system playbooks (provided by the platform). Reviewer-type agents in the workspace already have access to created playbooks and can consult them directly in AI chat conversations.
📋 Step by step: creating a Playbook
On the AI Agents screen, access the Playbooks tab

The screen is divided between custom and system playbooks

Click Create Manual to start creating a custom playbook

Fill in the instructions, output format, and response tone for the playbook

Add rules with name, description, category, and severity

Add verification items to ensure the agent validates all criteria before delivering the result

Click Create Manual to finish. The playbook will appear in the custom playbooks area, ready for use by reviewer agents

🗺️ Guided tour: Playbooks screen
Important:
You can navigate by clicking on the areas highlighted in orange or using the arrows in the bottom right corner of the interactive area.
Want to know how to create and configure playbooks? See the documentation.
2. Improvements
2.1 New visual identity on login screens
The ENSPACE login and pre-login screens have been updated with the platform's new visual identity. The layout, colors, and typography were redesigned to reflect the current ENSPACE identity, offering a more modern and cohesive experience from the very first interaction with the platform.
No login flow has been changed. The update is purely visual.
1. Entering screen:
Before

After

2. Login/Authentication screen:
Before

After

3. External Access Screen
Before

After

2.2 Form and field validations: cumulative behavior
The behavior of basic validations between fields and forms has been adjusted. Previously, when a field had configured validations and the same field was added to a form with its own validations, the form rules overwrote the field's rules. Now, validations stack: the field keeps its original rules and the form adds its own on top.
If your workspace has forms where validations were intentionally configured to overwrite the field's (for example, a field that is required by default but should be optional in a specific form), this behavior has changed. Review forms that use validations different from those configured on the field to ensure the cumulative result is as expected.
Want to learn more about validations in fields and forms? See the documentation.
2.3 Spaceflow: "empty" operator in conditionals
Spaceflow conditionals now include the "empty" operator, which checks whether a field has no value. Previously, to achieve the same result, you had to configure the conditional as "different from filled," which was less intuitive and could cause confusion.
Now, simply select the "empty" operator directly in the conditional configuration. For example: in a flow that needs to check whether the "Tax ID" field has not been filled before proceeding to a validation step, the configurator selects the "Tax ID" field and the "empty" operator, without needing inverted logic.
In Spaceflow, conditionals are present in the settings of the following nodes:
📋 Step by step: using the "empty" operator in the conditionals node
Open the conditionals node settings
Double-click the conditionals node to access its settings.

Create a new conditional
Click Add to create the conditional to be configured.

Select the field to be validated
In the conditional configuration, choose the field to be checked.

Add the field reference to the conditional
Go to the Input tab and drag the desired variable to the conditional's reference field.


Set the operator to "Empty"
Open the operator dropdown and select the Empty option.


Save the conditional configuration
Click Save and close. The conditional will be ready to validate whether the field has no value.

Want to learn more about conditionals in Spaceflow? See the documentation.
2.4 Spaceflow: weekly frequency in the start node with timer trigger
The Spaceflow start node, when configured with the Timer trigger mode, now supports weekly frequency. The configurator can define the day of the week and the exact time the flow should be triggered automatically.
In practice, this allows configuring recurring flows on specific days, such as a follow-up report every Monday at 8am or a reminder sent every Friday at 5pm, without depending on external integrations or schedulers.
📋 Step by step: configuring the weekly timer in the start node
Open the start node settings
Double-click the start node to access its settings.

Set the start mode to Timer
Set the flow's start mode to Timer.

Select the weekly frequency
In the frequency settings, choose the Week option.

Configure the weekly trigger parameters
Set the day of the week, time, and if needed, the timezone for flow execution. You can also enable exact time matching to filter only eligible items for processing.


Want to learn more about Spaceflow nodes? See the documentation.
2.5 Spaceflow: form filter in the start node
The Spaceflow start node, when configured with the item update event, now allows filtering by a specific form. Previously, the flow was triggered whenever the item was edited, regardless of which form was used. This form restriction already existed for item creation events, but not for updates.
Now, the configurator can define that the flow only triggers when the edit comes from a specific form. For example: in a support workspace with "Triage" and "Technical Response" forms, the configurator can create a flow that only triggers when the item is updated via the "Technical Response" form, without reacting to edits made through triage.
📋 Step by step: filtering by form in the start node
Open the start node settings
Double-click the start node to access its settings.

Configure the start mode
Select the Item actions mode.

Configure the reference category
Choose the category to be monitored by the flow.

Select the item update event
In the start node trigger, choose the Update action.

Select the form that should trigger the flow
After selecting the update event, the form field will become available. Choose the desired form so that the flow runs only when the edit happens through it.


Save the node changes
Click Save and close to complete the configuration.

Want to learn more about the Spaceflow start node? See the documentation.
2.6 Relationships: "Includes one of" operator in display filters
Display filters on relationship fields now include a new operator: "Includes one of". With it, the configurator can define multiple accepted values within a single filter condition. The filter returns all items that match any of the selected values.
In practice: if the configurator wants to display only clients whose billing activity is "paid" or "partially paid," there was previously no way to handle this scenario with the available operators. Now, simply use the "Includes one of" operator and select both values in the same condition. The filter returns all items that have at least one of the specified values.
📋 Step by step: using the "Includes one of" operator
When creating a field, you can select Simple Relationship or Multiple Relationship

The Display Filters field lets you define which items will appear as options in the relationship field

Click Add to create filters

Select the field to reference the filter

Configure the condition operator
A. Click Operator to select the conditional operation
B. Select the Includes one of option
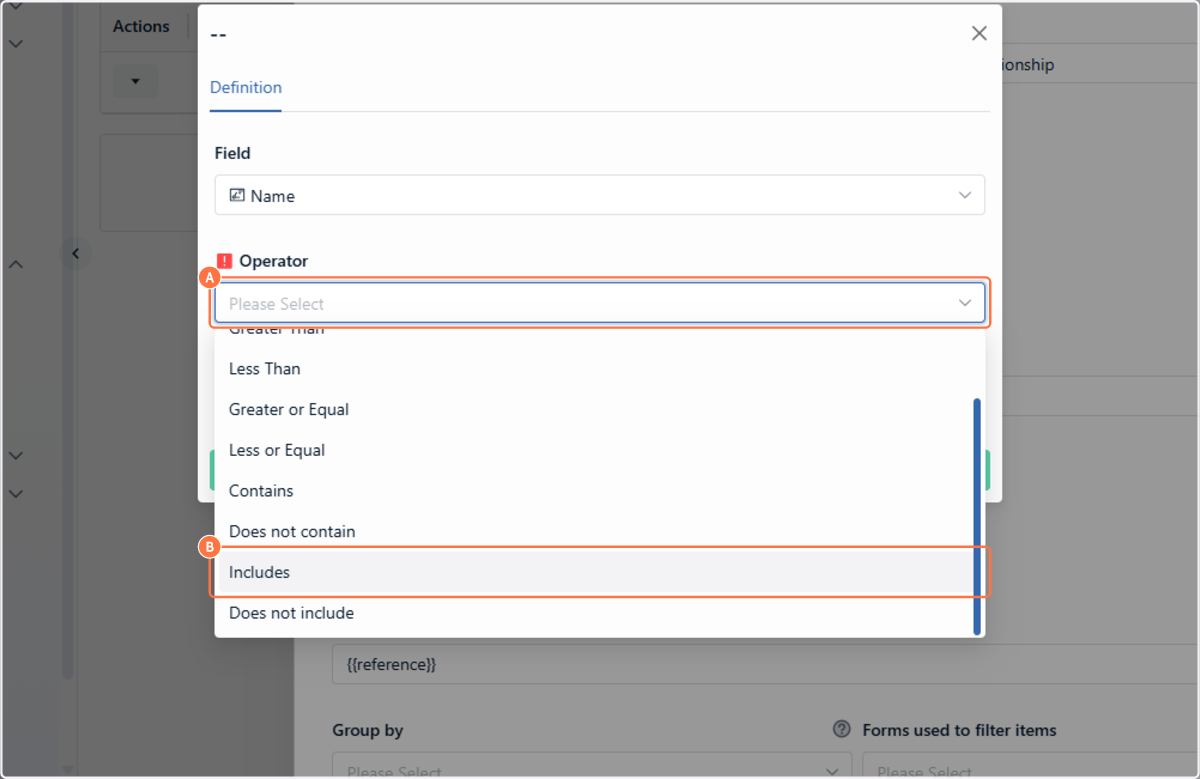
In the value field, you can add as many values as you want for this operator

Enter the values you want to use as a filter

Click Save

Want to learn more about filters in relationship fields? See the documentation.
2.7 Spaceflow: Markdown insertion in task, form, and approval node descriptions
The descriptions of Spaceflow Task, Form, and Approval nodes already allowed HTML editor formatting. Now, when typing / in the description field, the contextual menu offers the Markdown option. Selecting it opens a dedicated field where the configurator can paste raw Markdown content, which is automatically converted and rendered in the description body.
In practice, this speeds up formatting for users who already have content ready in Markdown. Instead of manually reproducing headings, lists, links, and tables in the editor, the configurator pastes the Markdown block all at once and the result appears instantly formatted in the description the end user will see when receiving the task.
📋 Step by step: inserting Markdown in a node description
Access any node that has HTML-type fields (for long descriptions). In this example, we will use the "Task content" field

In the description field, type / to open the contextual menu

Select the Markdown option

Paste the desired raw Markdown content into the dedicated field

Click Insert

The content will be automatically formatted in the field

Want to learn more about Spaceflow nodes? See the documentation.
3. Bug Fixes
The Spaceflow execution screen was displaying flow nodes without color and without information. Clicking on a node would not show input and output data, preventing users from following the execution.
The fix restores full display: nodes show their status colors again and, when clicked, input and output data are displayed normally.
The merge node, responsible for converging parallel flow paths at a single point, was throwing an error regardless of the applied configuration (required or optional edges, with or without labels). The error occurred in the node itself, interrupting the flow before reaching the next node.
The fix restores the merge functionality, which now converges paths and continues the flow normally.
In flows with a loop, the return edge was traversed (the log recorded the passage), but the target node was not restarted and the corresponding task was not generated. The loop line was also not highlighted on the canvas.
The fix ensures that, at each iteration, the target node is correctly restarted, the task is created, and the loop line is displayed on the canvas.
In tasks generated by approval nodes, the actions section (approve, reject, and comment) was displayed empty, preventing the user from interacting with the task.
The fix restores the display of action buttons, allowing the user to approve, reject, or comment normally.
The "Save changes" button in Spaceflow tasks was automatically completing the task instead of just saving the draft. In practice, the user lost the ability to save their progress without finishing the task, which could lead to unintended completions.
The fix separates the two behaviors: "Save changes" once again saves the draft without completing, and task completion once again requires an explicit action from the user.
Custom notifications configured in Spaceflow (such as task deadline alerts) had stopped firing. The configuration was saved normally, but no notification was sent.
The fix restores the triggering of custom notifications, which are once again sent according to the configured rules.
When attempting to create or edit a custom view (in any format, including kanban and table), the system returned an error, preventing the operation from completing. The issue persisted even when retrying.
The fix restores the creation and editing of custom views in all formats.
In custom views, table column labels were blank after creation. Attempting to edit the labels or recreate the view did not resolve the issue: when trying to save the change, the system returned an error.
The fix ensures that labels are displayed correctly and that editing works normally.
v2.12.0 is live
This release features 14 items: 6 new features, 5 improvements, and 3 bug fixes. Highlights include the redesign of the visual editor, the new executions screen, and the arrival of Artificial Intelligence nodes to Spaceflow, in addition to the complete overhaul of the quick tasks screen.
v2.14.0 is live
This release includes 31 items: 5 new features, 13 improvements, and 13 bug fixes. Highlights include dedicated HTML formatting in the Spaceflow email node, task reports with form field columns, a language selector in the external task portal, the inclusion of the legal rate in monetary correction indexes, and the ability to request re-sending of expired invites.