v2.14.0 is live


RELEASE NOTES
1. New Features
1.1 Spaceflow: HTML text formatting for the email node
The Spaceflow email node now includes a dedicated raw HTML field, allowing the composition of emails with HTML/CSS code directly within the flow.
The field supports inline attachment references via CID (cid:file_name or cid:file_id) and error handling for malformed HTML.
📋 Step by step: configuring HTML in the email node
In the flow editor, double-click the email node to open its settings

In the email body, click the HTML button to access the dedicated code field

The Format HTML field will open. Enter the desired HTML/CSS code

Click "back" to preview the formatting applied to the email body


To insert dynamic variables, use the rich text field (Body). Access the Input tab in the node's side menu and drag the desired variable into the email body


Click Save and close

Want to learn more about Spaceflow nodes? See the documentation.
1.2 Monetary correction: inclusion of the legal rate
The monetary correction field now includes the legal rate index, provided by the supplier via API, in two variants:
Legal Rate: for current calculations, as established by Law 14.905/2024.
Legal Rate (since 06/2005): the same rate reference, but with a historical series available from June 2005, recommended when the calculation requires earlier periods within this historical base.
In practice, in legal or financial workspaces that calculate value adjustments, the legal rate is one of the most frequently required indexes. Previously, it was necessary to look up the rate from external sources and enter it manually. Now, simply select it in the monetary correction field's index selector.
📋 Step by step: selecting the legal rate in the monetary correction field
In the category that has the monetary correction field configured, create or edit an item and locate the monetary correction field

Enter the value to be corrected and click the button to the right of the field to open the correction settings

In the index selector, search for "Legal Rate" and select the desired variant

Set the start date for the correction calculation. The end date is optional: if left blank, the correction will be updated indefinitely as indexes are published


Click Submit to finalize the correction settings, then Save to store the item

In the items table, track the monetary correction update for the created item

🗺️ Guided navigation: legal rate in the monetary correction field
Important:
You can navigate by clicking the areas circled in orange or by using the arrows in the bottom-right corner of the interactive area.
Want to learn more about the monetary correction field? See the documentation.
1.3 External task portal: native language selector
The external task portal now features a native language selector in the header, at the top-right corner of the screen. The button displays the flag of the active language and, when clicked, offers the three native language options available in ENSPACE. When a language is selected, the system's native texts (buttons, labels, and default texts) are automatically translated on screen.
In practice, for operations with suppliers, partners, or collaborators from other countries, the external user can navigate and respond to tasks in their own language, without relying on prior configuration by the workspace administrator.
📋 Step by step: changing the language in the external task portal
In the external task portal header, locate the button with the active language flag at the top-right corner

Click the button to open the dropdown with the 3 available language options

Select the desired language. The system's native texts will be automatically translated

Want to learn more about external tasks? See the documentation.
1.4 Re-sending expired workspace invites
When a workspace invite is not accepted within 1 month, it expires and the system displays an "expired invite" message on the invited user's workspaces screen. From that screen, the user can click "Request invite re-send" to request new access. A request email is automatically sent to the workspace owner and the user who originally sent the invite, and the requester receives an on-screen confirmation.
On the administrator's side, the Member Management screen now displays a banner with pending re-send requests. By clicking "View all," the administrator accesses the full list and can re-send invites individually or all at once. After re-sending, the invited user will have 15 days to accept the new invite.
📋 Step by step: requesting and re-sending an expired invite
On the workspaces screen, the expired invite is displayed with the "expired invite" message. Click "Request invite re-send"

The system will confirm that the request has been sent

For the administrator: on the Member Management screen (Settings > Member Management), a banner displays pending re-send requests. Click "View all"

The list of pending requests will be displayed. The administrator can re-send a specific invite or, if there are multiple pending, re-send all at once

🗺️ Guided navigation: re-sending expired invites
Important:
You can navigate by clicking the areas circled in orange or by using the arrows in the bottom-right corner of the interactive area.
Want to learn more about invites and member management? See the documentation.
1.5 Task reports: item columns and form fields
Task reports now support related item columns directly in the report builder. When creating a Tasks report, the available data sidebar now includes a folder called "Item" at the end of the list. By expanding it, the configurator accesses the related item's data and can add them as columns in the report.
In practice, this allows generating complete reports that combine structural task data (status, assignee, dates) with information from the linked item (custom fields, values, notes), eliminating the need for manual exports or spreadsheet cross-referencing. This behavior already existed in V1 and is now available in V2.
📋 Step by step: adding item columns to task reports
In the side menu, go to Structure > Categories and select the desired category. Then click the Reports card

Click Create and select the "Tasks" report type in the right sidebar

In the available data list, locate the "Item" folder at the end. Expand it to see the related item's data

Select the desired item data. It will be added as a column in the report's central builder

🗺️ Guided navigation: task reports with item columns
Important:
You can navigate by clicking the areas circled in orange or by using the arrows in the bottom-right corner of the interactive area.
Want to learn more about reports? See the documentation.
2. Improvements
2.1 Spaceflow: variables and field mapping in the HTTP node
The Spaceflow HTTP node received two enhancements to the body field:
Variables in the body field: the body's JSON editor now accepts drag-and-drop of input variables, allowing you to compose the request JSON with dynamic data from the flow.
Field mapping (FORM tab): in addition to the JSON editor, the node now offers the FORM tab, a field mapping mode with Key + Value pairs. Both the key and value accept fixed text, expressions, or variables. The configurator can switch between tabs freely, and the system automatically converts the form entries to JSON when returning to the editor.
📋 Step by step: using variables and the FORM mode in the HTTP node
In the flow editor, double-click the HTTP node and set the method to POST. Then, click Body

To insert variables, open the Input tab in the side menu and drag the desired variable into the JSON field

To use the simplified method, switch to the FORM tab. Fill in the KEY field (field identifier) and VALUE field (fixed text or variables)


When returning to the JSON Editor, the system automatically converts the form entries

🗺️ Guided navigation: variables and field mapping in the HTTP node
Important:
You can navigate by clicking the areas circled in orange or by using the arrows in the bottom-right corner of the interactive area.
Want to learn more about the HTTP node? See the documentation.
2.2 Spaceflow: output schema import in the HTTP node
The Spaceflow HTTP node now offers the Import JSON feature in the Response tab, allowing automatic generation of the output schema from external specifications. Four import methods are available:
OpenAPI (complete): paste the full JSON of an OpenAPI specification. The system extracts the attributes and automatically fills the schema repeater.
OpenAPI (schema only): paste only the schema attributes section, without the full specification structure.
Enspace format: paste a JSON array in ENSPACE's proprietary format to populate the schema directly.
API import: enter the HTTP method, the API URL, and the extraction key. The system makes the request, extracts the returned JSON, and generates the schema automatically.
📋 Step by step: importing the output schema in the HTTP node
In an HTTP node, double-click to access its settings and click Response. Then click Import JSON

Choose the desired import format. The first three options are manual (paste the JSON into the designated field)

Paste the JSON code into the field and click Import JSON. The schema repeater will be populated automatically


To import directly from an API, select the fourth option. Enter the request method, the API URL, and the extraction key

Click Import JSON and then click Save and Close to save the node configuration

🗺️ Guided navigation: output schema import in the HTTP node
Important:
You can navigate by clicking the areas circled in orange or by using the arrows in the bottom-right corner of the interactive area.
Want to learn more about the HTTP node? See the documentation.
2.3 Spaceflow: credential field in the start node with webhook
The Spaceflow start node, when configured in Webhook mode, now includes a credential field integrated with the workspace's credentials screen. The configurator can select an existing credential or create a new one directly via the shortcut in the field, without needing to access the Credentials screen first. The creation modal allows setting the name, type (such as Bearer Token, Basic Auth, or API Key), and credential value. Settings vary depending on the chosen type.
In practice, this centralizes security management: credentials are created and maintained as part of the flow and reused across Spaceflow webhooks, ensuring consistency and facilitating token rotation.
📋 Step by step: configuring a credential in the start node with webhook
In the flow editor, double-click the start node and set the method to Webhook. The Credential field will be displayed

Select a previously created credential or click the shortcut to create a new one


In the creation modal, define the name and type of the credential. Settings will vary depending on the chosen type

Fill in the credential value and click Save. The credential will be automatically linked to the webhook

Click Save and Close to save the start node configurations

🗺️ Guided navigation: credential in the start node with webhook
Important:
You can navigate by clicking the areas circled in orange or by using the arrows in the bottom-right corner of the interactive area.
Want to learn more about the Spaceflow start node? See the documentation.
2.4 Selection fields: auto-fill in dependent lists
In selection fields of type Single Selection List sourced from workspace lists, the system now allows configuring dependent lists with auto-fill. By enabling the "Multiple lists" option on the dependent field and activating the "Select first option when changing reference list" flag, the dependent field is automatically filled with the first available option whenever the user selects or changes the value in the reference field.
In practice, while the reference field is not filled, the dependent field displays no data. Once the user selects a value in the reference, the dependent field appears already filled, reducing clicks and fill errors. This behavior already existed in V1 and is now available in V2.
📋 Step by step: configuring auto-fill in dependent lists
In the category field configuration, create the reference field with the Single Selection List type and "Lists" source. Select the desired list and save

Create a second field (the dependent field) with the same configuration, but this time enable the Multiple Lists option

Define the reference field for the list and select all lists that will be dependent on the reference list

Enable the "Select first option when changing reference list" option and save

To verify: create an item in the category. Without the reference field filled, the dependent field will not display data

When selecting a value in the reference field, the dependent field will automatically be populated with the first available option

🗺️ Guided navigation: auto-fill in dependent lists
Important:
You can navigate by clicking the areas circled in orange or by using the arrows in the bottom-right corner of the interactive area.
Want to learn more about selection fields? See the documentation.
2.5 Spaceflow: hidden fields in forms
The Spaceflow form builder now allows fields to be marked as hidden. A hidden field continues to exist in the flow and can be used as a variable in subsequent nodes, but is not displayed to the end user in the task form.
In practice, this allows the configurator to pass data between flow nodes without exposing technical or intermediate information to the user filling out the task.
📋 Step by step: hiding a field in a Spaceflow form
In a form node, double-click to access its settings

In the form builder, add the fields you want

Click the Hide Field option. The field remains part of the workflow and can be used as a variable in subsequent nodes; however, it is not displayed to the end user in the task form

Click Save and Close

Want to learn more about Spaceflow nodes? See the documentation.
2.6 Spaceflow: related item identification in the executions screen
The Spaceflow executions list now displays a new Item column that identifies which item is related to each execution. Hovering over the item in the column opens a popover with its basic information and the option to copy the item reference with one click. For more details, the item can be accessed directly from the popover.
In practice, this eliminates the need to open each execution individually to find out which item triggered it, speeding up troubleshooting and flow monitoring.
📋 Step by step: identifying the related item in the executions screen
In the left-hand menu, click Spaceflows and choose the desired flow to access the executions screen

Hover your cursor over the item in the Item column. The popover will display its basic information and the option to copy the reference

To access the full item, click the link available in the popover

Want to learn more about the Spaceflow executions screen? See the documentation.
2.7 Custom views: improvements to the bar and names
Custom views received two improvements to their navigation bars:
Horizontal scrolling in the v1 bar (category screens): on native category screens, when the screen resolution or the number of views prevents all tabs from being displayed, the bar now allows horizontal scrolling, ensuring access to all options and the create button.
Truncated names with tooltip in the v2 bar (Quick Tasks): in the new views bar on the Quick Tasks screen, long names are abbreviated when they exceed 10 characters. Hovering over an abbreviated view displays the full name in a tooltip.
📋 Step by step: navigating custom views
On category screens, custom views appear in the v1 bar. Use horizontal scrolling to access all tabs

On the Quick Tasks screen, views appear in the new v2 bar, featuring horizontal navigation with arrows

Long names are abbreviated on the v2 bar. Hover your cursor over an abbreviated view to see the full name in the tooltip

Want to learn more about custom views? See the documentation.
2.8 New Quick Tasks screen: Item tab in the sidebar
The new Quick Tasks screen, currently available in the Lab as a beta feature, receives a new tab in the sidebar: Item. When clicking on a task that has a linked item, the Item tab appears in the sidebar, allowing you to view the item's data without leaving the quick tasks view.
In practice, this restores in the new experience a behavior already familiar from the previous screen, where the user could quickly access the item linked to the task directly from the sidebar.
📋 Step by step: accessing the linked item via the sidebar
In the left-side menu, click Tasks and access Quick Tasks
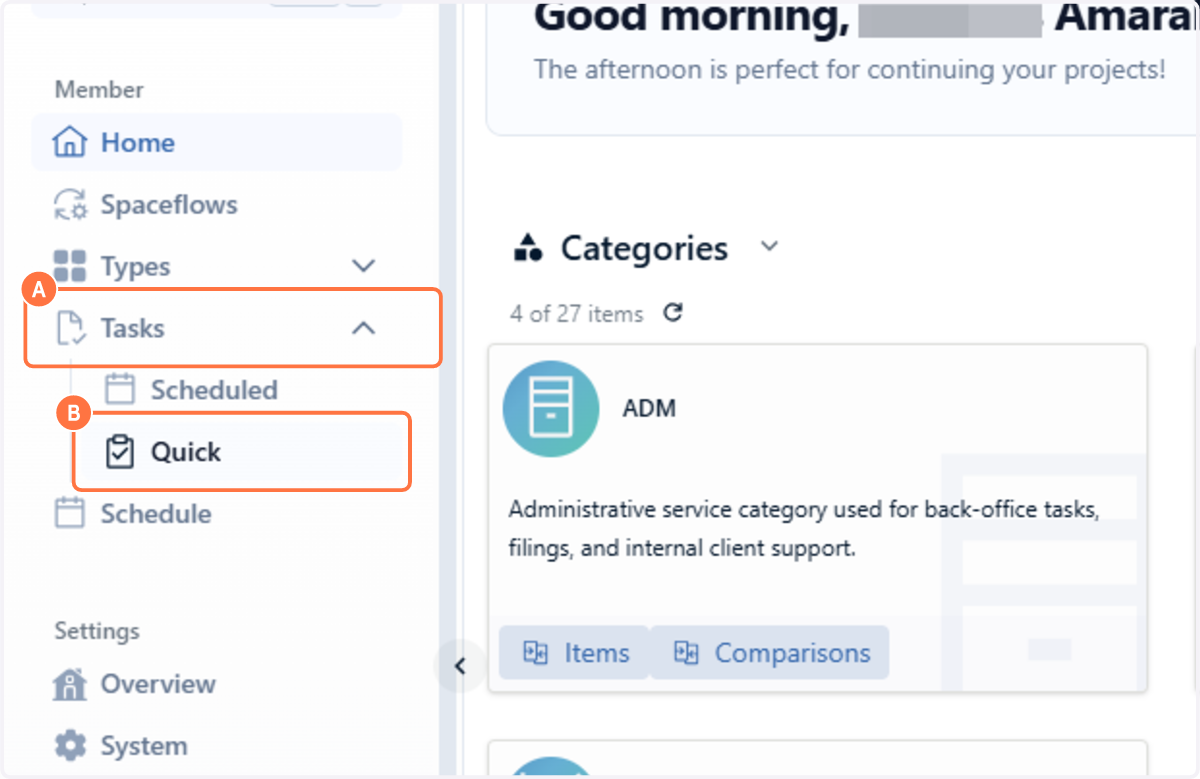
Click on a task to open the sidebar. If the task has a linked item, the Item tab will be available

Click the Item tab to review the linked item's data without leaving the task view

Want to learn more about quick tasks? See the documentation.
2.9 Credentials screen: view details and delete actions
The Credentials screen now includes View Details and Delete actions, accessible via the context menu (right-click on a credential). Clicking "View Details" opens a sidebar with the credential's information (name, slug, type, creation and update dates). To delete, there are two options: via the Delete Credential button inside the sidebar or directly via the Delete option in the context menu. In both cases, a confirmation modal is displayed before removal.
In practice, this standardizes the CRUD on the credentials screen and eliminates the need to navigate to another page to view or remove a credential.
📋 Step by step: viewing and deleting credentials
In the left sidebar menu, click System

Right-click on a credential to open the context menu dropdown containing "View Details" and "Delete"

Click "View Details" to open a standard sidebar displaying the credential details

If you want to delete a credential, you can do so directly from within the sidebar or by clicking "Delete" from the context menu dropdown

A confirmation dialog will appear so you can finalize the credential deletion

Want to learn more about credentials? See the documentation.
2.10 Chat field: full date display in history
The chat field history now offers full date (MM/DD/YYYY) and time for each message. The information appears when hovering over the information icon next to the message. In practice, in long conversations with multiple interactions over weeks or months, the exact date and time make it easier to locate a specific message without relying on relative references like "3 days ago" or "2 months ago."
📋 Step by step: viewing the full date in the chat field
In the left-side menu, click Types and open the category that has the Chat field configured

Open or edit an item in the selected category to access the Chat field history

Hover over the information icon to view the full date and time when each message was recorded

Want to learn more about the chat field? See the documentation.
2.11 AI Agents: full name tooltip in the selector
AI agent names that were truncated in the selector now display a tooltip with the full name on hover. The behavior works both in the agent selector on the Beni AI screen and in the Beni AI floating chat.
📋 Step by step: viewing an agent's full name
In the left-hand navigation menu, click on BENI AI and expand the selector options to choose your AI Agent

Hover your mouse over an AI Agent option with a truncated name; a tooltip will appear displaying the full name

The same behavior is available in the BENI AI floating chat where the tooltip also displays the full name of the AI Agent

Want to learn more about AI agents? See the documentation.
2.12 Person/Company field adaptation to the new alphanumeric CNPJ
The Person/Company field is being prepared for the new alphanumeric CNPJ format scheduled for July 2026, while maintaining compatibility with the current numeric CNPJ. The update also includes real existence validation for CNPJ: when entering a number, the system checks whether the CNPJ exists. If not found, the value is treated as invalid and the system does not allow the entry, displaying a clear message to the user.
Want to learn more about the Person/Company field? See the documentation.
2.13 Email case-insensitive standardization
The system now treats emails as case-insensitive in a standardized manner. In practice, this means that addresses like user@company.com and User@Company.com are recognized as the same email, preventing duplicate registrations and login failures caused by uppercase/lowercase differences.
The normalization has been applied to external user emails, which are now always stored in lowercase.
3. Bug Fixes
When inserting variables in Spaceflow form fields, the fields became visually shrunk, compromising readability and usability of the form.
The fix restores the correct sizing of fields when receiving variables.
Events configured on fields stopped correctly returning the data or variable used in the expression (for example, relationship variables like item_related.data) after field editing. The issue affected selection fields with translation and events in relationship and multi-relationship.
The fix restores the correct data return in event expressions, including scenarios with translation and multiple relationships.
When typing "/" in the content field (Markdown) of the task node, the context menu opened but the behavior was inconsistent in option selection and insertion, making the editor unstable.
The fix stabilizes the context menu and Markdown content insertion in node descriptions.
In the custom reports builder, date formatting (DD/MM/YYYY) applied in the standard report was not reflected in the custom report. Additionally, the column delete button was not working correctly.
The fix ensures date formatting is applied consistently between standard and custom reports, and restores the column delete button functionality.
The relationship field tooltip appeared behind the dropdown, remaining hidden and inaccessible to the user.
The fix adjusts the z-index so the tooltip is displayed above the dropdown.
The image context menu in the HTML field displayed missing icons and visually stuck options. After a previous fix, the menu had started appearing inside the image space instead of above it.
The fix restores the positioning and visual display of the image context menu.
When accessing the dedicated item screen in certain categories, all ENSPACE tabs became completely frozen, preventing any interaction with the platform.
The fix eliminates the freeze and restores normal loading of the dedicated item screen.
On first platform access, the labels of required fields (such as first name and last name) were not displayed, leaving the user with no reference about what to fill in.
The fix restores label display from the first access.
In reports with circularizable fields, visual styles (such as highlight colors) stopped being applied and did not persist after reconfiguration attempts.
The fix restores the application and persistence of styles in report circularizable fields.
During migration processes, Person-type fields showed errors in the options list due to incorrect accent characters (for example, "Física"), causing several fields to not be filled correctly.
The fix normalizes the characters and restores correct field filling during migration.
In the external task portal, when clicking a task, data stopped loading automatically. The user had to click the task and then click "Task" again for the information to be displayed.
The fix restores automatic data loading when selecting a task in the portal.
In item migration (bulk update and creation), the "Skip Flows" button only considered category flows, but not Spaceflows. Migrated items could trigger unintended Spaceflows during the process.
The fix extends the button behavior to include Spaceflows, ensuring migration skips all flow types when requested.
When rejecting an approval task, the "Reason" field did not display an indication that filling it in was mandatory, allowing rejection attempts without justification.
The fix adds a clear mandatory indication and a message informing that filling in the reason is required to complete the rejection.
v2.13.0 is live
This release includes 17 items: 2 new features, 7 improvements, and 8 bug fixes. Highlights include custom translation dictionaries per workspace and the playbooks interface for AI agents.
2.15.0 is live
This release includes 17 items: 4 new features, 6 improvements, and 7 bug fixes. Highlights include Branch Separation in Conditionals, the Standard Report for Quick Tasks, Advanced Color Configuration in Dashboards, and the Disable Field Editing option.